Full bleed in printing refers to a design or image that extends completely to the edges of the printed page, leaving no margins or borders. It is a technique used to ensure that after trimming, the artwork reaches the edge of the paper seamlessly.
For instance, a flyer or poster where the background color or image continues to the very edge is considered full bleed. This approach helps printed materials look polished, professional, and visually appealing.
If you are new to designing for print, the term full bleed might sound technical, but it is one of the simplest yet most important concepts to understand. Full bleed is all about how your design interacts with the edges of the paper. Unlike digital design, where the edges of the screen are fixed and predictable, printing requires careful consideration because paper needs to be trimmed, and printing equipment can have slight variations.
Imagine designing a bright red poster with a full background color. Without full bleed, after trimming, you might end up with a thin white border around your poster. That is why full bleed exists. It gives your artwork extra space beyond the final trim size so that even with minor cutting inaccuracies, your design remains edge-to-edge.
Full bleed is a professional standard in printing and is commonly used in marketing materials such as brochures, posters, flyers, business cards, magazines, and product packaging. It ensures your designs appear seamless and visually striking. In this article, we will explain what full bleed is, how it works, why it is important, practical tips for designers, common mistakes to avoid, and frequently asked questions about this printing technique.
Understanding Full Bleed in Printing
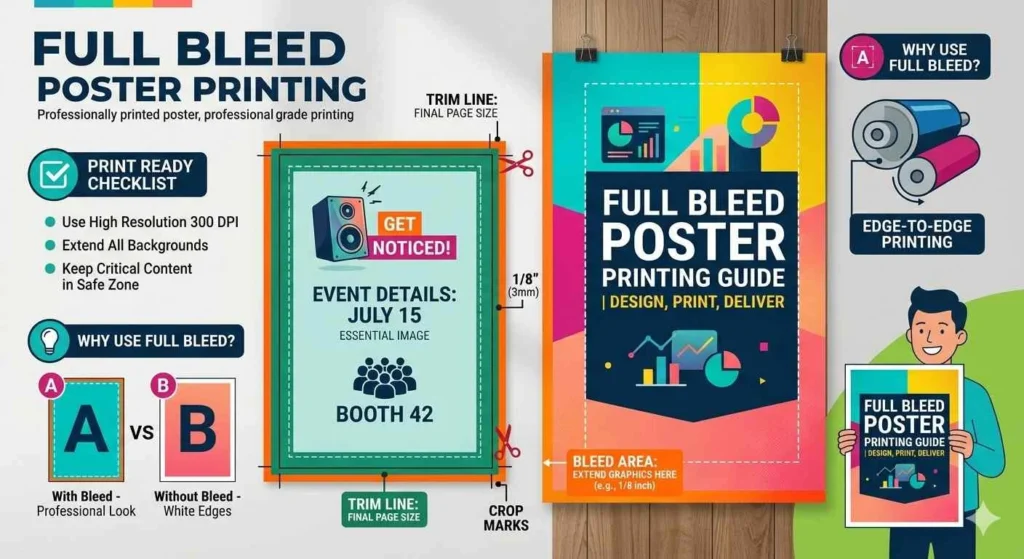
Full bleed refers to a design that extends beyond the intended trim line of a printed document. Every printed sheet has a final size, known as the trim size. To prevent any unprinted edges from appearing on the finished product, printers require that backgrounds, photos, or graphics extend slightly beyond this trim line. This extra space is called the bleed area.
For example, if you are designing an A4 flyer with dimensions of 210 mm by 297 mm, you might add 3 mm of bleed on all sides. That means your design file would actually measure 216 mm by 303 mm. After the printing process, the paper is trimmed down to the standard A4 size, and your design reaches all edges of the page without any unwanted white lines.
Full bleed is not just about color or images. Any element that is meant to appear at the very edge of the page should extend into the bleed area. This technique ensures the final printed piece looks exactly as intended.
Why Full Bleed Is Important
Full bleed provides several important benefits that make it essential for professional printing.
Professional Appearance
Designs that extend to the edge of the page look polished and intentional. Whether it is a brochure, flyer, or business card, full bleed makes your design appear carefully crafted rather than incomplete or amateurish.
Consistency After Trimming
Printing machines can have slight variations when cutting paper. Bleed ensures that even if the paper is trimmed a tiny bit off-center, the design will still reach the edge and there will be no unprinted margins.
Creative Flexibility
Full bleed gives designers freedom to create bold and dynamic visuals. Images, patterns, and colors can flow from edge to edge, producing a more immersive and visually striking design.
Marketing and Branding Impact
Marketing materials such as posters, banners, and flyers often use full bleed to make a strong impression. An edge-to-edge design grabs attention more effectively than one with margins. Packaging also benefits from full bleed because colors and graphics extend to all sides, giving products a professional, high-quality appearance.
How Full Bleed Works
When designing for full bleed, the layout is intentionally made slightly larger than the final trim size. This extra area outside the trim line ensures that after cutting, the design reaches the very edge. The key is to extend background colors, images, and graphics into the bleed area, but keep important text and logos within the safe zone.
The safe zone is an area inside the trim line where essential elements are placed to ensure they are not accidentally cut off. For instance, if a brochure has text near the edge, placing it in the bleed area risks it being trimmed. By keeping text and key elements inside the safe zone, designers maintain clarity and readability while still taking advantage of full bleed for backgrounds and visuals.
Bleed, Trim, and Margin
Understanding the difference between bleed, trim, and margin is essential for successful full bleed printing.
| Term | Definition | Purpose |
|---|---|---|
| Bleed | Extra area outside the trim where design extends | Ensures artwork reaches the edge after trimming |
| Trim | Final size of the printed page | Determines the exact finished dimensions |
| Margin | Space inside the trim line where important elements are placed | Prevents text and graphics from being cut off |
Using these three elements correctly guarantees a clean and professional final product. Designers extend the background into the bleed area, position essential elements within the margin or safe zone, and then rely on the trim line for the finished size.
Full Bleed in Different Print Materials
Full bleed is used across a wide variety of print materials. Here are some examples:
Posters and Flyers
Posters and flyers often rely on full bleed to create bold visuals. A bright background or full-page photo that extends to the edge gives the material an eye-catching, professional look.
Brochures and Booklets
Brochures and booklets frequently use full bleed for images and background colors. This allows images to flow across multiple pages or panels without interruptions, creating a seamless experience for the reader.
Business Cards
Business cards with edge-to-edge color or patterns require full bleed to avoid accidental white borders. Full bleed ensures the final card looks clean and premium.
Magazines and Books
Editorial spreads in magazines often feature photographs or graphics that extend across the page. Full bleed makes the layout visually compelling and polished.
Product Packaging
Boxes, labels, and other packaging elements use full bleed to extend branding elements to all edges. This ensures that the product appears high-quality and professionally designed.
Tips for Creating Full Bleed Designs
Creating designs with full bleed requires careful attention to detail. Here are some tips for designers:
Include Bleed in Your Document Setup
Most design software allows you to set up bleed when creating a new document. Typically, 3 mm to 5 mm is standard, but always check with your printer’s specifications.
Keep Important Elements in the Safe Zone
Text, logos, and key graphics should remain inside the safe zone to prevent them from being cut off during trimming.
Extend Backgrounds Beyond the Trim
All colors, patterns, and images that should appear at the edge must extend into the bleed area. This ensures a seamless appearance after cutting.
Use High-Resolution Images
Printing at full bleed requires high-quality images to avoid pixelation. A resolution of 300 dpi is generally recommended for professional print materials.
Check Your File Format
Export your design as a print-ready file, such as PDF, with bleed settings included. Crop marks can also be added to indicate where the paper should be trimmed.
Common Mistakes to Avoid
Even experienced designers sometimes make errors when preparing full bleed designs.
- Placing text or logos in the bleed area
- Forgetting to extend the background into the bleed
- Using low-resolution images that look pixelated at the edges
- Not including bleed in the document setup, which may lead to white edges after printing
By avoiding these mistakes, you can ensure your printed materials look professional and polished.
FAQs
What does full bleed mean in printing
Full bleed means that your design or image extends beyond the edges of the page so that after trimming, the artwork reaches the edge with no margins.
How much bleed is needed
Most printers require 3 mm to 5 mm on each side, but it is best to check the printer’s requirements.
Can I print without full bleed
Yes. Printing without full bleed leaves a margin around the page, which is sometimes desirable depending on the design.
What is the safe zone in full bleed printing
The safe zone is an area inside the trim line where important elements like text or logos are placed so they are not accidentally cut off.
Does full bleed affect paper size
Yes. Your design file will be slightly larger than the final trim size to include the bleed area.
Do all printers support full bleed
Not all printers can print full bleed. Professional offset printers usually do, but it is important to confirm with your printer before finalizing the design.
Is full bleed used for digital printing
Yes, full bleed is used for both digital and offset printing to ensure edge-to-edge coverage.
What are crop marks
Crop marks are small lines printed at the corners of your document to show where the paper should be trimmed. They help ensure precise cutting for full bleed designs.
Conclusion
Full bleed is a fundamental concept in printing that ensures your designs look professional, polished, and visually compelling. By extending images, colors, and backgrounds beyond the trim line, full bleed prevents unwanted white edges and creates seamless, edge-to-edge visuals.
Understanding the differences between bleed, trim, and margin, and following best practices, allows designers to create high-quality print materials such as posters, brochures, business cards, magazines, and packaging. Using full bleed gives designers creative freedom while maintaining precision, resulting in print products that leave a lasting impression.
Whether you are a professional designer or a beginner creating your first print project, full bleed is a simple yet essential technique for achieving professional results. By carefully setting up your files, keeping important elements in the safe zone, and extending backgrounds to the bleed area, your designs will come out looking exactly as you intended.
Read More Related Articles:
- KK Mean in Texting: Why It Can Sound Passive-Aggressive (2026)
- POG Mean in Gaming: From Epic Wins to Gaming Chat Reactions (2026)
- English Meaning of “Puta”: Definition, Usage and Cultural Notes In 2026

Luna Hartley is a content creator at TextSprout.com, where she specializes in explaining word meanings, modern phrases, and everyday language used in texts and online conversations. Her writing focuses on clarity and context, helping readers understand how words are actually used in real communication.